Upcoming Event

Showing posts with label On the Bench. Show all posts

Monday, March 23, 2015

Miniature Monday - 03/23/2015


Decided to change things up and work on a Tyranid model.  Longtime readers of my blog will recall that my original Tyranid army was purple and brown.  I was never fond of the color scheme, but it worked at the time.  This color scheme is closer to what I am wanting in a Nid army.  The biggest challenge with this model was deciding on a conversion that worked but wasn't #ODT.  I also knew it would be a risk to use the same color scheme for the talons and base, but it seems to work for me.

Monday, March 9, 2015

Miniature Monday - 03/09/2015


The next CSM for the squad. Since this marine is wearing a helmet, I felt the need to add the green element via the clawed hand.  It was a bit of a lazy conversion, but one I figured fit with the overall look of the unit.

Monday, March 2, 2015

Miniature Monday - 03/02/2015


One of the first models I completed this year was a Chaos Space Marine.  The model took me about two weeks to complete, but that was mostly because I kept switching projects and working on certain elements in groups (i.e. resin bases).

Wednesday, June 4, 2014

On the Bench: Eldar Dire Avenger

Worked on this model over the last few days. Very surprised how quickly I got him finished.

Friday, March 7, 2014

On the Bench - Shogun Miniatures Movement Tray Review

This article is by John Ontto

Recently I saw a friend of mine post on Facebook about these trays from Shogun Miniatures and I saw them being used at Heroes Haven in Michigan City, IN so I had to check them out for myself.  They offer flanged steel trays as well as just sheet metal trays and magnets. It seems they do work squarely for square and rectangle bases.  Great for warhammer fantasy and Flames of War. 

On their website they have a sizing charts in (mm and inches) for bases( 20x 20)(25x25) etc. In addition to their standard size offerings, they can also do custom trays based on millimeters.  When ordering custom trays, they even make sure to add a couple of mm to the order to ensure that everything will fit nicely on the tray.

After checking out their site, I decieded to purchase 2 steel flanged trays; one to hold 60 25mm bases 10 wide by 6 deep and one to hold 8 40mm bases 4 wide by 2 deep.  The flanges are on the front and sides so your minis don't slide around on the tray.   Upon receiving the trays, I found them to be clean and smooth  with no rough edges that may cause a finger cut. The customer service was excellent; the owner of the the company was prompt in answering any questions I had about the product.

For more information about Shogun Miniatures and all of their products, check out their website at www.shogunminiatures.com

Monday, February 17, 2014

On the Bench: Ogre Firebelly


With all of the excitement around AGoM, I am finding it really hard to actually sit down and write-up anything I am working on at the moment.  I guess the positive is that I am getting stuff done and should have a reasonably finished army when I step off the plane next week. 


When it came to creating my firebelly/butcher, I was inspired by the Oni from Japanese folklore.  According to Wikipedia:

Oni (?) are a kind of yōkai from Japanese folklore, variously translated as demons, devils, ogres or trolls.

Depictions of oni vary widely but usually portray them as hideous, gigantic ogre-like creatures with sharp claws, wild hair, and two long horns growing from their heads.[2] They are humanoid for the most part, but occasionally, they are shown with unnatural features such as odd numbers of eyes or extra fingers and toes.[3] Their skin may be any number of colors, but red and blue are particularly common

Looking at various depictions of them, I felt that the horns were the primary element that I had to include on my model if I wished to allude to the folklore.  I also felt that by giving him long hair in a ponytail, it would also provide similar visual cues to a traditional Oni.  I did toy around with the idea of painting the model in darkflesh and adding red highlights to it, but I felt that it would clash too much with the color scheme of the army to be worth the effort.


Friday, February 7, 2014

On the Bench: Citadel Technical: Blood for the Blood God Review

As part of the process of preparing for AGoM, I had to complete a couple more ogre bulls to add to my existing unit. One of the new bulls was going to be armed with an ironfist similar to another model in the unit and since I wanted to keep uniformity across the unit, I decided to paint it with a blood splatter like the other one. The original model was painted using a series of Vallejo reds, gloss varnish, and a good helping of glaze medium and thinner. For the new model, I decided to test out the new Citadel Technical: Blood for the Blood God paint.

One of the things about the new paint is that it is advertised as “It's a translucent paint, similar to a wash, but thicker and with vivid colour”. Opening the pot, I have to agree with the word “thick”, as the paint had a consistency that was more similar to a regular paint than any wash I have purchased. I also agree that it had a deep crimson color, but at first glance, I wasn’t confident that it would result in the range of colors that I was hoping to imitate.


When it came to apply the paint, I decided to not thin it like I usually do with paints. Instead, I poured a little in my palette and applied the first layer using a 0/2 liner brush. I gave the paint a few minutes to dry before applying another layer that was “inside” the first layer. I repeated this process a few times until I had enough coverage that I expected the anticipated effect to be achieved.

As you can see from the end results, the effect was fair, but certainly didn’t produce results that were outstanding. I think the paint can be useful for someone that is looking for something simple and quick, but it will not replace taking the time and effort to paint blood using a more “artistic” approach. I would have liked to have seen GW also provide a little free guidance on how the paint should be used as I am curious if the effect would have been better with a little bit of thinning. Maybe after AGoM, I will give it another try and see if the results are different.

Correction: GW does provide a little tutorial video on how to use the paint.  After AGoM, I will give the paint a try after watching the video and see if I can get better results.

Friday, January 17, 2014

On the Bench: Ogre Kingdoms Unit Filler


One of the interesting things about the Midwest WFB scene is our dedication to painting and fielding amazing armies.  At any given tournament, you can expect to see work that would rival the stuff that appears in White Dwarf (R.I.P.) or on the GW website.  While having such a rich environment when it comes to painted armies, it also means that the standards can be pretty high when it comes to paint judging.  To this end, it has become almost mandatory that an army has some level of freehand if it wants to earn maximum points at the majority of tournaments.

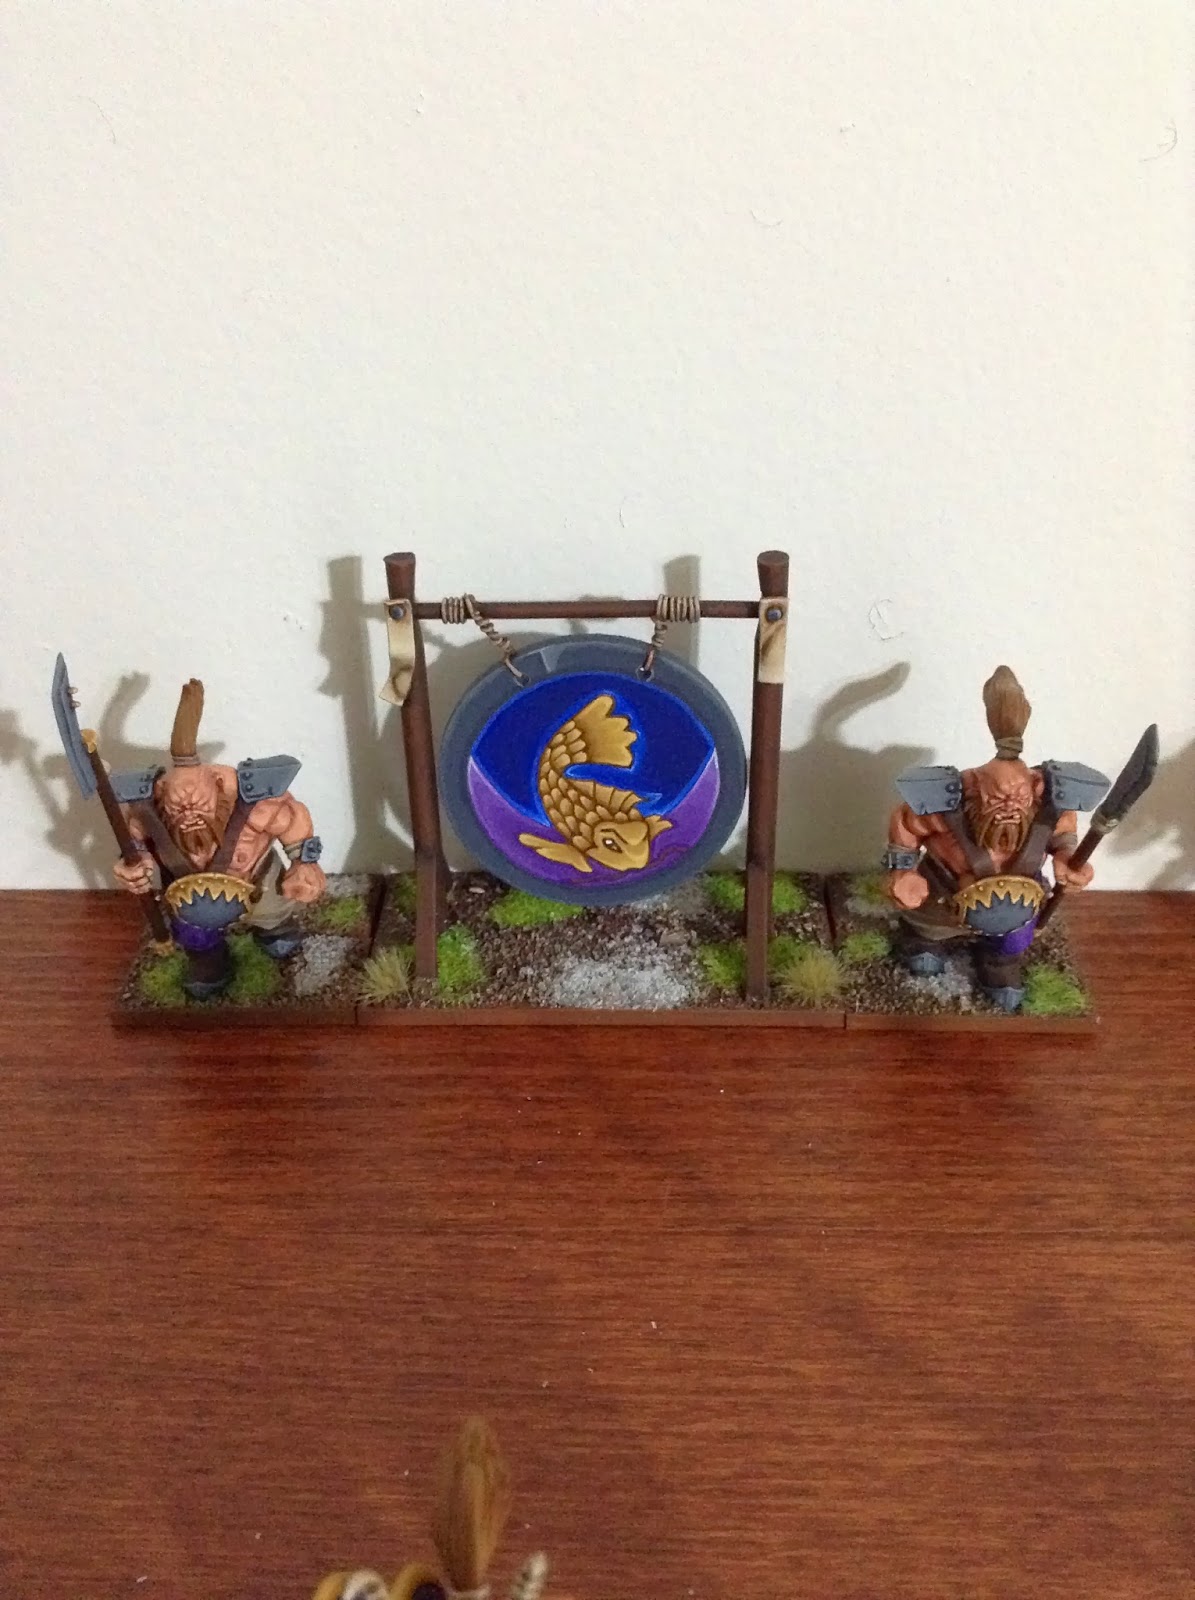
Typically when someone is doing freehand, it is done on a standard as they are a great way to add a little uniqueness to a regiment.  Since another element of many local tournaments is to award points for a scratch built model, I decided to combine the requirement with free-hand details to create a custom gong for my ironguts. 

When it came to picking the actual image, I debated for a period whether or not to do some kind of dragon.  It seemed like the obvious choice and easily tied into the Asian inspired theme of the army.  In the end, I felt it was too obvious and decided to explore other Japanese images that might work.  I considered Kirin and phoenix pictures, but again they felt too obvious.  As I was looking at various pictures, I started to notice that koi were a common theme among many of them.  After a bit more searching on the topic, I decided to use one as the basis for the free-hand on the gong.

Using a picture I found on the website Quiet Forest, I drew a similar image on the gong I had created using plastic rods, wire and a wooden 40mm base.  One the image was drawn, I traced over it using a fine detail brush and Vallejo Charred Brown.  Next, I used Reaper Golden triad, Vallejo Brown ink and GW Sepia wash to color the fish.  Once the fish was colored, I reapplied the Charred Brown to better bring out the details.

To complete the background of the gong, I first used a pencil and another 40mm base to trace a semi-circle.  Next, I colored in the first part of the circle using a combination of Vallejo Hexed Purple, Vallejo Purple Blue, and Vallejo Dead White.  As for the blue sections of the model, I used Vallejo Imperial Blue, Vallejo Dark Blue, and Vallejo White to shade and highlight the area around the koi.

To complete the model, I painted the outside ring on the gong using Vallejo London Grey, Vallejo Black Grey, and Vallejo Light Grey.  The wood holding the gong was painted using a combination of Vallejo Charred Brown and Vallejo Vermin Brown.  The base was painted using the same scheme as the army and flocked with a combination of Army Painter and GF9 products.

Friday, December 27, 2013

On the Bench: Veteran Guardsmen with Shotguns - Part Three

The third member of the Matchstick Boys has been completed. With the completion of the third model, I still feel like the casting on these models is not the best. I do like the look of the bandaged head, but it lacks the smooth curves that are on the plastic cadians.

When it comes to the color scheme I am using for this unit, I am finding that I like the sharper highlights on the blue. It does make the models pop a little more and draw the eye to them. I also think the brown boots are a nice contrast with the other colors on the model.

One last note is that I have not been satisfied with the quality of the pictures I have been taking with the iPad mini. I am not certain if it user error, the lens being dirty, or just the quality of the camera, but regardless, I am going to switch back to using my digital camera that I had used in the past. Just wanted to make a note of this as I feel like the pictures I have been posting don’t do a good job of showing off each model.

Friday, December 20, 2013

On the Bench: Veteran Guardsmen with Shotguns - Part Two


This is the second veteran guardsman that I have completed for the unit I am referring to as the ‘Matchstick Boys’. Similar to the last one, this one uses parts from the Forgeworld Cadian Hardened Veterans kit. I like the kit in general, but feel the casting of the head I used for this model was off. In particular, the area around the eyes seems sunken and off when compared to how the model looks in the picture on the Forgeworld website.


Another piece that I decided to add to this model was the resin backpack that came with the Forgeworld kit. I wasn’t sure at first if it would be appropriate as the unit is intended to depicted as an escort for a group of criminals being unloaded from a chimera transport. In the end, I was pretty happy with how it looked, though I do think that it was also slightly miscast like the head.

Friday, December 13, 2013

On the Bench: Army Painter Winter Tuft

Since I have first seen this product at my FLG, I have been debating on whether or not I wanted to try it. Recently, I finally broke and decided to try using it with the intention of writing a short review. In general, I really love the Army Painter line of products. In a future review, I will discuss my thoughts on their line of primers, but for now, I want to focus on their Battlefield Winter Turf scenery kit.
Photobucket

The purpose of the Battlefield kits is to provide bases with some larger clumps of grass without going thru the hassle of trying to do them from scratch. At ~$5.00 for a blister’s worth of the turf, the product is well priced for folks looking to upgrade the look of their scenic bases. Each blister contains enough turf in various sizes to cover a reasonable size regiment of WFB or 40K bases. On the back of the packaging, instructions on how to use the product are included.
Photobucket

The actual application of the turf is a snap and works as advertised. First, find the piece of turf that you want to use from the blister.
Photobucket

Second, place a small drop of Elmer’s glue where you want to stick the turf.
Photobucket

Third, remove the piece of turf from the blister using a pair of pliers.
Photobucket

Finally, place the piece of turf firmly, but not hard, onto the glue drop.
Photobucket

Overall, I found Army Painter’s Battlefield Winter Turf to be a great option for adding a little something extra to your bases. They make different versions of the turf product, including ones colored for a jungle or swamp. The process of adding the turf is simple and effective, so it is a great option for decorating multiple bases in a single sit-down. My only negative is that I would like to see Army Painter bundle the product as a part of a complete basing kit. They may already do this, but I have not seen such a kit at my FLG, so I am assuming for now it is not available.

Monday, December 9, 2013

On the Bench: Eagle Warriors Space Marine - Part 7


If there is one aspect of space marine models that I would say is iconic, it would be the shoulder pads. The reason I would call them out is that they give weight to the model and serve as a quick identifier of the marine’s chapter. They can also be the part of a marine that makes or breaks the overall visual of the model.

When selecting the shoulder pads for my first unit of tactical marines, I debated over whether to go with more complex ones (possibly even 3rd party ones) or use the simple ones from base marine kit. In the end, I decided on the simple pads as the model already contained a lot of extras (purity seals, eagle icons, etc…) and I wanted to give myself breathing room when working on HQ models.

The process for painting the model is basically the same as I shared in prior articles. The one nice part about doing the shoulder pads was that I did not have the challenge of trying to paint the divide between blue and white sections. The downside upon completion is that I felt they were kind of plain looking and actual detracted from the model. I may circle back with the unit once it is finished and add some type of freehand to all of the units pads, just to make them standout better.

Monday, December 2, 2013

On the Bench: Eagle Warriors Space Marine - Part 6


One of my favorite color schemes to paint right now is pseudo-NMM gold. When I do it well, I love the brightness and contrast of the color scheme on a model. The challenges however is that when it is done wrong, it can have the reverse effect of making the intended area appear dull.


(Paint:Thinner:Glaze)
Privateer Press White Primer
Reaper Chestnut Brown (4:1)
Vallejo Brown Ink (1:8)
Reaper Chestnut Brown (4:1:1)
Reaper Chestnut Brown and Reaper Palomino Gold (2:2:1)
Reaper Palomino Gold (4:1:1)
GW Sepia Wash Reaper Palomino Gold (4:1:1)
Buckskin Pale (4:1)


The paints outlined above are more of a general guide than an exact step-by-step breakdown of how I painted the gold sections of the model. The trick that I found when painting these sections is to be flexible and not afraid of making touch-ups as you go. I find sometimes that I need to go back over a section with a lighter or dark layer to better blend the colors. I also make stupid mistakes, like miss whole sections, and find myself backtracking to catch-up the missed area.


Monday, November 25, 2013

On the Bench: Veteran Guardsmen with Shotguns - Part One


At the moment, I am juggling a couple of different projects in an effort to keep myself motivated. To this end, as I find myself becoming frustrated or bored with one project, I can jump over to another one that can be done more quickly. The good thing about doing this is that I keep getting stuff painted. The bad piece is that I need to jump around too much; otherwise I will never finish an actual squad or regiment.


The color scheme used for this model is similar to ones that I have used in the past for my guardsmen, but with a few noteworthy changes. The first major difference between this guardsman and the ones from the prior squad is that I focused more on adding “hard” highlights to the model. Another difference was that I included the Vallejo Magic Blue to the mixture when working on the blue areas. Finally, I decided to go with brown boots that matched the belts instead of the dark grey ones on the first squad.


The ultimate goal with this squad is to have a 10 man unit of veterans armed with shotguns and flamers. I also plan on painting a chimera for this unit that is armed with heavy flamers on the turret and in the hull. Whether or not that actually happens is a matter of time and dedication, but for now I feel it is a strong possibility.

Friday, November 22, 2013

On the Bench: Eagle Warriors Space Marine - Part 5

One of the reasons I decided to use the new Sternguard kit was that I really like the look of space marines accented with robes, cloaks, and loin clothes. Maybe it is because I also love the imagery of super heroes that I find myself wanting the same with my marines (after all, space marines are the super heroes of the 40k universe). The challenge in the past was that the only models that really had such a look were in metal or finecrap. Thankfully that has changed with the new kit and I can now expand my army to fit the idea I have had for years.


When it came to painting the loincloth, I wanted to use the scheme provided in the GW painting guide, but I did not want to use GW paints again. To this end, I needed to match-up my Vallejo paints with the ones being suggested by GW. Thankfully, DAKKDAKKA has a great conversion chart that allowed me to identify close matches in the Vallejo range. To begin the process, I painted the cloth areas with Vallejo Game Color Khaki (061). Once the paint was dry, I applied a wash of GW Seraphim Sepia. While I generally dislike the GW paint line, I do admit that their washes are superior to any other ones I have tried. When applying the washes, I apply two or three coats. The first one is a general coat over all of the khaki areas. Once the first coat has dried, I do another layer into the deeper portions of the model.

Once the washes have dried (usually a couple of hours or the next day), I begin the process of layering the highlights. I begin with a layer of thinned khaki (4:1:1) and slowly add Vallejo Bleached Bone to each new layer of the mix. As the layers become lighter, I also add Vallejo Glaze Medium and thinner to the paint to better blend the layers.

In the end, I get a nicely blended looking loin cloth. I may try to add a little white into the mix with the next one as I feel this one could use some stronger highlights. I may also experiment with starting darker (Khaki/Brown mixture) and using more layers instead of the wash.